About Kenny

This author has not yet filled in any details.
So far Kenny has created 28 blog entries.

UPGRADING KITCHEN ELECTRICAL DURING A REMODEL

Upgrading Kitchen Electrical during a Remodel

One of the most common complaints from homeowners about their old kitchens is the lack of electrical outlets. If your existing electrical service is only 60 amps, plan to upgrade during your kitchen remodel to at least 100 amps and preferably 150 or 200 amps.

  • Code requires a receptacle every 6 feet, but having them every 4 feet would be better. Remember, however, that each circuit can handle a maximum of eight receptacles. Adding three or four outlets to the overall electrical layout could require running an additional small appliance circuit to the kitchen.

If your home still has fuses, consider upgrading to circuit breakers. Breakers are designed to react more quickly to power fluctuations, thus protecting your home more efficiently. Plus, breakers can be reset and they’re ready to go again. After a fuse blows, it must be replaced.

  • Hire a licensed electrician to upgrade your home’s main service because you’re dealing with disconnecting and reconnecting the high voltage lines that come to your house. Besides, your home’s entire electrical supply will be shut off while the switch is being made and you want to be without power for as short a time as possible. If you do decide you want to do the electrical upgrade yourself, or any major electrical wiring work on your home, check with your homeowner’s insurance provider to see if they allow you to do the work. If you do the work and it’s inspected and signed-off by your city electrical inspector, you should be okay.

If you’ve ever had the chance to see how electrical cables get from the main panel to the various locations in the house, then you know that the cables run through holes drilled in the wall studs. Drilling through the studs is not very difficult, as long as you use the right tools. An electric right-angle drill is the power tool you’ll need. The drill’s chuck (the piece that holds the drill bit) is set at a right angle to the drill body, which allows you to drill without having to get the entire drill and spade bit within the space between the wall studs.
Drill the holes in the middle or back third of the stud. Accessing this area is usually not too difficult either because wall studs are supposed to be placed every 16 inches or 16-inch-on-center (16 o.c.). This 16-inch spacing is enough to let you get the drill and paddle bit started into the stud. Don’t worry if the bit is started at a slight angle. After you get the first 1/2 inch or so of the bit into the wood, you’ll be able to level the drilling angle.

You also should install a protective steel plate on the face surface of the wall stud where you drilled the hole. The plate is nailed onto the stud and prevents you from drilling into the stud at that point, for example to hang a picture, and accidentally nicking the electrical cable with the drill bit.

After the holes are all drilled, you can pull the electrical cable from the service panel to the first box of the circuit run. You’ll pull shorter lengths of cable from each box to each box, as needed, to connect the entire circuit. Always pull more cable than you’ll need. You can always cut it off, but you can never add a short jumper section if the cable is too short. That’s a code violation, and it’s dangerous!

By Donald R. Prestly from Kitchen Remodeling For Dummies

UPGRADING KITCHEN ELECTRICAL DURING A REMODEL2021-04-12T10:21:20-05:00

HOW TO REPLACE A PORCH LIGHT

How to Replace a Porch Light with a Security Light

Replacing your porch light with a security light is an easy afternoon project. Outdoor security lights use infrared or microwave sensors to light up whenever someone or something passes within a certain range. Use them to safeguard your house without the expense and inconvenience of leaving a harsh light glaring all night. You wire a security light just like an indoor ceiling or wall fixture. To replace an outdoor light fixture with a security light, follow these steps:

  1. Turn off the power at the fuse or circuit panel.
  2. You may find several pairs of wires in the wall box. Some of these wires may be wired to different circuits than the fixture you’re working on. Be safe: Use a circuit tester or turn off the power to the whole house to ensure that all the wires in the box are dead.
  3. Remove the light bulb cover and bulb from the fixture.
  4. Unscrew the screws or nuts holding the fixture base to the wall box.
  5. Lower the fixture base and remove the electrical tape or wire nuts from the black (hot), white (neutral), and, if present, green (ground) wires.
  6. Use wire nuts to attach the wires from the new fixture to the corresponding wires in the electrical box.
  7. Raise and position the new base plate so that you can screw the new bolts through it to attach to the mounting strap.
  8. An outdoor fixture has a weather gasket that’s inserted between the utility box and the cover plate of the fixture. The gasket helps prevent water from getting into the box. Use the gasket, even if you install the light in a weather-protected outdoor area.
  9. Screw in the bulb and replace the bulb cover (if any).
  10. Turn on the power and try out your toy.

Most units have a sensitivity adjustment. You may have to do a bit of experimenting with this setting to prevent the light from turning on when a bird flies by or the neighbor’s cat strolls into your yard at 3 a.m. Have a helper walk into the sensor’s field of view. If the unit doesn’t light up, increase the sensitivity until it does.

By Roy Barnhart, James Carey, Morris Carey, Gene Hamilton, Katie Hamilton, Donald R. Prestly, and Jeff Strong from Home Improvement All-in-One For Dummies

HOW TO REPLACE A PORCH LIGHT2021-04-12T10:21:38-05:00

HOW TO USE LIGHTING FOR INTERIOR DESIGN

How to Use Lighting as an Interior Design Element

Lighting for Interior Design – You don’t have to know everything about lighting or spend tons of money to make rooms look light and lively. You do need to know the basics of functional and decorative lighting and how to get help for planning and buying lighting. Lighting design is broken down into three kinds of illumination: general lighting, task lighting, and accent lighting. Mix all three types to achieve decorative lighting.

Decorative lighting creates mood (an overall feeling of serenity or playfulness) and meaning (communication; sometimes this includes signage, such as Exit). Flat, functional lighting (such as the kind in your office) puts people on the alert. Decorative lighting, on the other hand, brings out the shape of objects, the “feel” of texture, and important keynotes.

A decorative lighting scheme has variation in light levels and sources that indicate what rooms are for (dim lights in rooms for sleeping, bright lights in playrooms) or what a room’s focal point is.

Create focal points with chandeliers and pendants. In a dining room, for example, a chandelier placed over a table draws attention with its soft upward-cast light. (Chandeliers are Traditional.) A pendant light used over a table, however, casts a more concentrated light downward and out. (Pendants are Contemporary.)

To create a plan, consider what, where, and when activities take place. Lighting needs to vary its intensity to accommodate multiple activities that occur in a single room. For example, your kitchen may be your favorite place to cook, read, do your hobbies, watch TV, and entertain. Would you want the same level of light for a party that you want for mopping the floor?

Lighting stores and home remodeling centers have trained personnel who can steer you toward your best possible lighting choices. Bring your floor plans and other decorating notes with you when you consult a lighting expert.

General lighting

General, or ambient, lighting illuminates an entire space for visibility and safety. Light bounces off walls and ceilings to cover as much area as possible.
              General lighting can come from up-lights or down-lights:

      • Up-lights point illumination toward the ceiling. Up-light fixtures include torchiers and wall sconces.
      • Down-lights cast light down from the ceiling or wall. Popular down-lights include recessed lights (cans) and track lights.
      • Some lights, such as table and floor lamps, are both up- and down-lights because they cast light toward both the ceiling and the floor.

Task lighting

Task, or work, lighting illuminates smaller areas where more intense light is needed. Task light should be three times as bright as general lighting. Overly bright work lamps won’t make up for a dimly lit room (instead, you may develop eyestrain). Using higher light per watt (LPW) bulbs in other fixtures or increasing the number of fixtures to boost general lighting fixes this problem.

Good task lighting fixture choices are well-positioned recessed lights, track lighting, pendants, table or floor lamps, and under-cabinet lighting strips.

Accent lighting

Accent lighting adds brilliant shimmer to make your precious objects, paintings, sculptures, and outstanding architectural features stand out. Use a bulb that’s no more than three times as bright as the surrounding general light. Position the fixture so that the light doesn’t block your line of sight so that no glaring reflections bounce back.

If you’re using track lighting for wall washing (lighting a nontextured wall) or wall grazing (lighting a textured wall), aim the beam of light at a 30-degree angle from the vertical to prevent glare and hot spots.

Halogen makes the best accent light because of its intensity and brilliance.

Source:  Katharine Kaye McMillan and Patricia Hart McMillan from Home Decorating For Dummies, 2nd Edition

HOW TO USE LIGHTING FOR INTERIOR DESIGN2021-04-20T10:25:34-05:00

HOW TO REPLACE A LIGHT SWITCH WITH A DIMMER

How to Replace a Light Switch with a Dimmer

Replacing a standard single-pole or three-way switch with a dimmer switch is no different than replacing a standard switch. Remember: Dimmer switches don’t work on most fluorescent fixtures, and low-voltage lighting requires special low-voltage dimmers.

Check the rating of the dimmer switch you purchase. Most dimmer switches can handle 600 watts of power. Count the number of light bulbs that the switch controls and add up the maximum wattage bulb allowed for the fixture. For example, if the switch controls a light fixture which accommodates up to two 100-watt bulbs (200 watts total) a 600-watt dimmer will have no problem, but a string of seven recessed lights could overload the dimmer.

To replace a standard switch with a dimmer switch, follow these steps:

  1. Turn off the power to the switch at the circuit or fuse panel.
  2. Unscrew and remove the switch plate; then use a voltage tester to make sure that the circuit is dead.
  3. Unscrew the switch from the electrical box and pull it out with the wires still attached.
  4. Remove the wires from the old switch.
    Dimmer switches are usually connected to the house wiring by short lengths of wire coming out of the switch body rather than by screw terminals.
  5. Use the connectors (wire nuts) supplied with the fixture to attach the black wires coming out of the dimmer switch to the colored wires that were attached to the terminals on the old switch.
    First, twist the wires together, and then screw on the wire nut.
  6. Push the new switch back into the electrical box and screw it in place. The body of a dimmer is larger than the switch being replaced. Don’t just force it in. Often, you need to reposition or better organize the wires first to make room for it.
  1. Screw on the switch plate.
  2. Push the control knob, if there is one, onto the shaft protruding from the switch.
  3. Turn on the power.

By Roy Barnhart, James Carey, Morris Carey, Gene Hamilton, Katie Hamilton, Donald R. Prestly, and Jeff Strong from Home Improvement All-in-One For Dummies

HOW TO REPLACE A LIGHT SWITCH WITH A DIMMER2021-04-12T10:21:50-05:00

HOW TO INSTALL A CEILING FAN

A ceiling fan is a stylish and functional addition to any room. If you are planning to install a ceiling fan in a room that already has a ceiling outlet, wiring a ceiling fan is the same as wiring any ceiling fixture. If the room doesn’t have an overhead box, hire an electrician to install the box and fish the wires through the walls and across the ceiling. Save the fun of installing the actual fan for yourself.

If you can access the ceiling on which you want to attach the fan from the attic or from an overhead area, you have several choices in the type of box you install. If you can’t get to the area above the box, you have to use an adjustable hanger bar designed for installation through the hole left by the existing ceiling box.

To replace a ceiling fixture, follow these steps:

1.) Turn off the power at the fuse or circuit panel.

You may find several pairs of wires in the ceiling box. Some may be wired to circuits other than the one that the fixture you’re working on uses. Be safe: Use a circuit tester or turn off the power to the whole house before attempting to install a ceiling fan. That’s the only way to be sure that all wires in the box are dead.

2.) Remove any light bulb cover and bulbs from the fixture and then unscrew the screws or nuts holding the fixture base to the ceiling box.

Because ceiling fans are so heavy, the National Electrical Code (NEC) prohibits attaching a ceiling fan to a standard ceiling box. Before you purchase the fan, check the manufacturer’s installation instructions and purchase an approved electrical ceiling box.

3.) Lower the fixture base and remove the electrical tape or wire nuts.

The wires come in two or three colors: black (hot), white (neutral), and, if present, green (ground) wires.

4.) Disconnect the wires to the existing ceiling box and remove it.

First, loosen the cable clamp screw that secures the incoming cable to the box. Then remove the box, working from above, if possible. Otherwise, remove any accessible fasteners (nails or screws) that attach it to the framing or push it up into the cavity to pry it from the framing or bend its hanger bar, depending on how it is attached.

5.) Follow the manufacturer’s directions to install the adjustable hanger bar and ceiling box.

You install most hanger bars by pushing them through the hole in the ceiling left by the old electrical box. When you have the hanger bar completely through the hole, rotate it until it’s perpendicular to the ceiling joists. The bar expands until it engages the ceiling joists. The ends of the hanger bar are equipped with sharp steel pins that dig into the wood joists when the hanger bar is expanded. You then attach the special ceiling box to the hanger bar, locking it in place to provide a secure base for the fan.

6.) Assemble the fan according to the manufacturer’s instructions.

Ceiling fans are heavy, so they require support while you attach the wires. Most models provide a way for you to suspend them below the ceiling box while you attach the wires. If yours doesn’t, get a helper to support the fan assembly while you attach the wires.

Wiring schemes differ slightly from fan to fan, depending on whether they’re equipped with a light or speed control. The basic installation of a ceiling fan is no different from that of a standard light fixture. Use wire nuts to attach the fan’s black or colored wire and white wire to matching wires in the ceiling box. If the wiring has a green ground wire, attach it to the green or bare wire in the box.

7 ) Complete the attachment of the fan assembly to the ceiling box.

This should just involve a few screws.

8.) Install the trim and fan blades according to the manufacturer’s directions.

Turn on the power and test the installation.

By Roy Barnhart, James Carey, Morris Carey, Gene Hamilton, Katie Hamilton, Donald R. Prestly, and Jeff Strong from Home Improvement All-in-One For Dummies

HOW TO INSTALL A CEILING FAN2021-04-12T14:52:57-05:00

HOW TO REPLACE AN ELECTRICAL OUTLET

How to Replace an Electrical Outlet

If an outlet (commonly called a receptacle) no longer holds a plug snugly, it should be replaced. The procedure for replacing a duplex (two-outlet) wall receptacle is similar to that of replacing a switch. The only difference is that, depending on where the receptacle is located in the wiring scheme of your house, it may have more wires attached to it than you find attached to a light switch.

Look closely at the terminal screws of the new duplex receptacle. On each side of the receptacle is a pair of terminal screws. The upper screw is connected to the upper outlet, and the lower screw services the lower outlet. A thin, metal break-off tab connects these screws. This tab enables you to attach a single wire to either screw and feed electricity to both outlets of the receptacle. If the tab is broken off, you can connect the upper and lower outlets to separate wires and control them independently.

If the receptacle is wired to the end of a series of receptacles, it usually has only two wires, and possibly a third ground wire. If it isn’t the last receptacle, two additional wires may be connected to it in order to carry current to the next receptacle. Just rewire the new receptacle the same way the old one was wired.

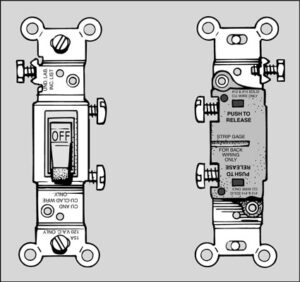
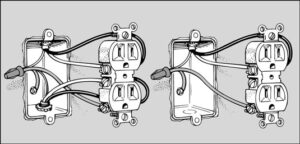
You may also wire the receptacle so that a switch controls the upper outlet and the lower outlet is on, or hot, all the time. In this case, you need to remove the break-off tab connecting the two sets of like-colored terminals on each side of the receptacle. Otherwise, the tab remains intact, and you can see a metal bridge connecting the terminals.

The important point to keep in mind is that hot (black or colored) wires attach to brass screws and neutral (white) wires attach to silver screws. If the unit is back-wired, the colored wires are located in the holes behind the brass screws and the white wires in the holes behind the silver screws. If you attach a white wire to a brass screw or a colored wire to a silver screw, you may see fireworks.

To replace a standard duplex receptacle, follow these steps:

  1. Turn off the power to the receptacle from the main fuse or circuit panel.
  2. Unscrew and remove the cover plate; then use a voltage tester to make sure that the circuit is dead.
  3. Unscrew the receptacle from the electrical box and pull it out with the wires still attached. Note where the white and black wires are attached to the old receptacle.
  4. Remove the wires.
  5. Carefully inspect the old receptacle to see if the break-off tab connecting the two sets of terminals on each side of the receptacle is broken off. If it is, remove the corresponding tabs from the new receptacle.To break off the tab, grip it with long-nose pliers and bend it back and forth until it breaks off.
  6. Attach the wires to the terminals of the new receptacle.If the wiring has a green ground wire, attach it to the green terminal on the receptacle or to the electrical box.
  7. Push the new receptacle back into the electrical box and screw it in place.
  8. Screw on the cover plate and then turn on the power.
By Roy Barnhart, James Carey, Morris Carey, Gene Hamilton, Katie Hamilton,Donald R. Prestly, and Jeff Strong from Home Improvement All-in-One For Dummies
HOW TO REPLACE AN ELECTRICAL OUTLET2021-04-14T15:18:15-05:00

HOW TO REPLACE A LIGHT SWITCH

If a light switch fails to function, it should be replaced. Most modern switches have screw terminals on each side and may also have holes in the back to accept the end of the wire. Although plug-in connections may be more convenient, they are less reliable than those with screw terminals, so don’t use them!

You can easily loosen the screws on the side of the device with a standard screwdriver (turning counterclockwise), but you may find getting the wires out of the back of the device tricky. To remove these wires, insert the blade of a small screwdriver into the slot under the hole into which the wire is inserted and push in as you pull the wire loose. Pushing the blade of the screwdriver into the slot releases the grip on the inserted wire. Here are descriptions of the wires and where they go:

  • The white (neutral) wire connects to the silver screw, or you place it in the back wire hole on the same side of the device as the silver screw.
  • The black (hot) wire goes to the brass screw or into the hole in the back of the device on the same side as the brass screw. This wire is sometimes red.
  • The green or bare copper (ground) wire, if the device has one, attaches to the green screw terminal on the switch or to the electrical box.

If the switch has On and Off embossed on its body and it’s the only switch that controls lights or receptacles, it’s a single-pole switch. To replace this kind of switch, follow these steps:

  1. Turn off the power to the switch at the main circuit breaker or fuse panel.
  2. Unscrew and remove the switch plate; then use a voltage tester to make sure that the circuit is dead.
  3. Unscrew the switch from the electrical box and pull it out with the wires still attached.
  4. Two or three wires will be attached to the switch: an incoming hot wire, which is black; a return wire, which carries the load to the fixture and may be black, red, or any other color except green; and sometimes a grounding wire, which is green or bare copper. There may be other wires in the box, but you are only dealing with the ones connected directly to the switch.You may find a white wire that has black tape on it connected to the switch. This tape indicates that the white wire is being used as a black or colored wire in the switch leg, so it’s not neutral.
  5. Compare your new switch with the one you’re replacing to find the corresponding locations for the electrical screw connectors.Because the power is off, you can match up the connectors the easy way: Instead of disconnecting all the wires at once and possibly getting confused, unscrew and connect one wire at a time.
  6. Attach the first wire you unscrew to the same-colored screw on the new switch as it was on the old; do the same with the second.To connect a wire to a terminal, strip off about 1/2 inch of insulation, using a wire stripper, and twist the end into a clockwise loop with long-nose pliers. The loop must wrap at least two-thirds but no more than three-quarters of the way around the terminal screw. Hook the wire clockwise around the screw so when you tighten the screw with a screwdriver, the clockwise force of the tightening screw makes the loop wrap tighter around the screw.
  7. Gently push the new, wired switch back into the electrical box and screw it in place.
  8. Screw on the switch plate and turn on the power.
By Roy Barnhart, James Carey, Morris Carey, Gene Hamilton, Katie Hamilton,Donald R. Prestly, and Jeff Strong from Home Improvement All-in-One For Dummies
HOW TO REPLACE A LIGHT SWITCH2021-04-14T15:19:36-05:00

HOW TO WORK WITH ELECTRICITY SAFELY

How to Work with Electricity Safely

If you don’t know how to work with electricity safely, you can injure or kill yourself. Following basic electrical safety tips is crucial — after all, you never know who worked on the wiring before you.
  • Electrical shocks can kill, so don’t do repairs when you’re tired, distracted, or rushed.

  • Follow a routine and double-check yourself each step of the way.

  • Remember that just because hot wires are supposed to be colored and the neutral wire white, people don’t always follow the rules, especially if they don’t know what they’re doing.

  • Double-check to make sure that the appliance is unplugged before you start to work on it.

  • Turn off the circuit breaker or unplug the fuse that feeds electricity to the outlet or switch you want to work on. If in doubt, turn off all power to the house.

  • Read instructions several times until the sequence is fixed in your mind.

  • Examine cords and wires carefully so that you know which part is hot and which is neutral. Colored wires are supposed to be hot and white is neutral.

  • Know your plugs. The narrow prong always carries electricity; the wide prong is neutral.

  • Never work in or near water with power equipment.

  • Don’t open the service panel while standing in water.

  • Clearly label wires and bend them, in different directions so that no part of your hot wires accidentally touch each other.

  • Check that the power is still off before you twist or splice wires together. Match color to color; don’t cross them.

  • Always review each step to make sure you did it right, especially before turning the power back on.

For more information on electrical safety, visit the Electrical Safety Foundation International.

If your easy fix doesn’t work and you’re reluctant to go further, or if you’re really leery about handling a hot wire, call a licensed professional.

By Gary Hedstrom, Peg Hedstrom, and Judy Ondrla Tremore from How to Fix Everything For Dummies
HOW TO WORK WITH ELECTRICITY SAFELY2021-07-21T14:35:35-05:00