
If a light switch fails to function, it should be replaced. Most modern switches have screw terminals on each side and may also have holes in the back to accept the end of the wire. Although plug-in connections may be more convenient, they are less reliable than those with screw terminals, so don’t use them!
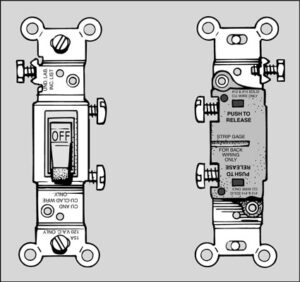
You can easily loosen the screws on the side of the device with a standard screwdriver (turning counterclockwise), but you may find getting the wires out of the back of the device tricky. To remove these wires, insert the blade of a small screwdriver into the slot under the hole into which the wire is inserted and push in as you pull the wire loose. Pushing the blade of the screwdriver into the slot releases the grip on the inserted wire. Here are descriptions of the wires and where they go:
- The white (neutral) wire connects to the silver screw, or you place it in the back wire hole on the same side of the device as the silver screw.
- The black (hot) wire goes to the brass screw or into the hole in the back of the device on the same side as the brass screw. This wire is sometimes red.
- The green or bare copper (ground) wire, if the device has one, attaches to the green screw terminal on the switch or to the electrical box.
If the switch has On and Off embossed on its body and it’s the only switch that controls lights or receptacles, it’s a single-pole switch. To replace this kind of switch, follow these steps:
- Turn off the power to the switch at the main circuit breaker or fuse panel.
- Unscrew and remove the switch plate; then use a voltage tester to make sure that the circuit is dead.
- Unscrew the switch from the electrical box and pull it out with the wires still attached.
- Two or three wires will be attached to the switch: an incoming hot wire, which is black; a return wire, which carries the load to the fixture and may be black, red, or any other color except green; and sometimes a grounding wire, which is green or bare copper. There may be other wires in the box, but you are only dealing with the ones connected directly to the switch.You may find a white wire that has black tape on it connected to the switch. This tape indicates that the white wire is being used as a black or colored wire in the switch leg, so it’s not neutral.
- Compare your new switch with the one you’re replacing to find the corresponding locations for the electrical screw connectors.Because the power is off, you can match up the connectors the easy way: Instead of disconnecting all the wires at once and possibly getting confused, unscrew and connect one wire at a time.
- Attach the first wire you unscrew to the same-colored screw on the new switch as it was on the old; do the same with the second.To connect a wire to a terminal, strip off about 1/2 inch of insulation, using a wire stripper, and twist the end into a clockwise loop with long-nose pliers. The loop must wrap at least two-thirds but no more than three-quarters of the way around the terminal screw. Hook the wire clockwise around the screw so when you tighten the screw with a screwdriver, the clockwise force of the tightening screw makes the loop wrap tighter around the screw.
- Gently push the new, wired switch back into the electrical box and screw it in place.
- Screw on the switch plate and turn on the power.
By Roy Barnhart, James Carey, Morris Carey, Gene Hamilton, Katie Hamilton,Donald R. Prestly, and Jeff Strong from Home Improvement All-in-One For Dummies